
An Automator Folder Action for Screenshots and Dropbox
01/09/2011
I strive for minimalism when using computers. Less software, less processes, less distraction. I have a block colour as my desktop background. I don't install superfluous software, no matter how beautifully-crafted. My computer is a tool (well, my OSX partition is anyway), not a game, so I treat it as such. If you rely on your computer, treat it well. Know where everything is and know what's installed at all times. If something becomes surplus to requirements, remove it.
I use Dropbox as my cloud sharing weapon of choice. I share folders with friends and colleagues, and all of my screenshots are saved to a sub-folder of my public folder so that I can easily share them with anyone. This workflow might seem inherently insecure, but I don't tend to screenshot things that are particularly secret; whether that's a result of my screenshots having been public for so long, I don't know.
You can easily change your screenshots directory from your Desktop to your Dropbox folder by opening a Terminal (/Applications/Utilities/Terminal.app) and running the following command:
defaults write com.apple.screencapture location /Path/to/Dropbox/Public/Screenshots
I like to have them in their own folder as I use Public for other things and don't want it becoming overrun with screenshots. I don't delete images; occupational hazard.
You can now close your Terminal window and go back to ignoring it if it scares you. I know a lot of people are uncomfortable with it. Once you're saving screenshots to that directory, you can download the Automator Workflow. Unzip and open with Automator. You'll be asked if you want to install it. If you trust me, click install and the workflow is copied to the correct directory and opened for you to edit (you're going to need to edit).
You should be presented with a screen that looks a little something like this:
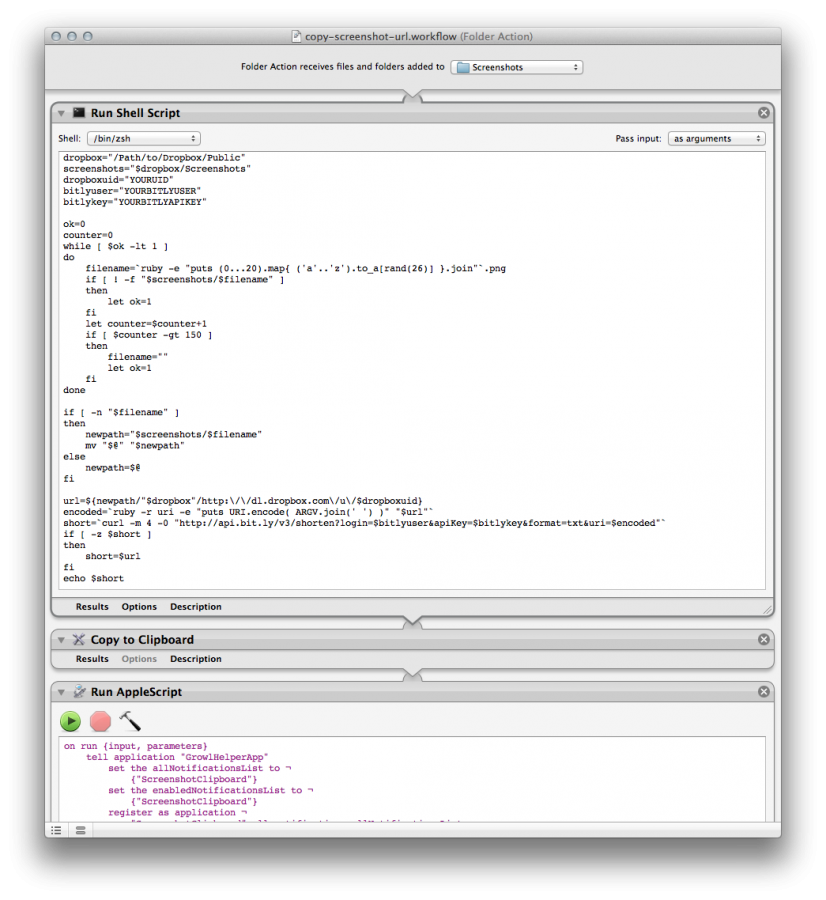
We're only interested in the first box, where you've got some config to edit.
dropbox: The path to your Dropbox folder.
screenshots: The path to your Screenshots folder. Must be relative to $dropbox.
dropboxuid: Your Dropbox User ID. Go into your Dropbox Public folder, context-click (right click, thanks Apple) > Dropbox > Copy Public Link. Your User ID is the big number in the URL copied.
bitlyuser: Your bit.ly username.
bitlyapikey: Your bit.ly API Key can be found at the bottom of this page.
You may not care if your URL gets shortened. If this is the case; find the following block of code in the first box:
short=curl -m 4 -0 "http://api.bit.ly/v3/shorten?login=$bitlyuser&apiKey=$bitlykey&format=txt&uri=$encoded"
if [ -z $short ]
then
 short=$url
fi
echo $short
And replace it with:
echo $url
Now you'll just get the Dropbox Public URL copied to your clipboard; not bit.ly (which bit.ly will probably prefer if you take a lot of screenshots!)
I'm making the following assumptions about your system:
- You have Growl.app installed. If you're not sure, open System Preferences and look for a pane under "Other" called "Growl".
- You have Dropbox installed
- You have changed your Screenshots path (using the method above) to be within your Dropbox Public folder
- You have OSX Lion installed. I don't see why it shouldn't work on Snow Leopard, but I haven't tried and I can't.
If you satisfy those criteria, you should have success with this workflow. It is, however, offered with no support and I will accept no responsibility if you break your computer playing around in the Terminal because it looks like The Matrix or trying to update Ruby (system Ruby works fine) or something. If you're friendly and would like some help, please ask on my Formspring and I'll try to help. I'm by no means an expert at Automator, bash or zsh scripting or AppleScript but I can get things to work. I suck at AppleScript so badly that I had to paraphrase the AppleScript portion of this Workflow from here.